Silas ate four of these in one afternoon and then asked why I “don’t make popsicles more often.”
Sir. You had a choice this whole time. Store-bought popsicles were always right there in the freezer aisle, full of dye and corn syrup and mystery flavor number seven.
I just never bothered making my own because I assumed it would be a whole production. Special equipment, weird ratios, probably a candy thermometer involved.
It’s none of that.
These are three ingredients, one blender, and a freezer doing all the actual work. No cooking. No stove. No skill required.
If you’ve got fruit that’s about to turn and a few dollars of popsicle molds, you’re basically done already.
I started making these last summer after buying way too many strawberries at the farmers market and refusing to let them go bad. Now it’s just what we do when fruit is about to turn.
Why This Recipe Works
Real fruit freezes into something naturally sweet and creamy on its own. You don’t need to dump sugar into it to make it taste good.
The yogurt base is the trick most people skip. It keeps the popsicles from turning into rock-hard ice blocks, so you actually get that soft, scoopable bite instead of chipping a tooth.
And because you’re blending whole fruit instead of using juice, you get real texture. Little flecks of strawberry seed. Actual mango pulp. It tastes like fruit because it is fruit.
Store-bought popsicles are mostly water, sugar, and food coloring. These are mostly fruit. That’s kind of the whole pitch.
There’s also something satisfying about controlling exactly what goes in. No red dye 40, no high fructose corn syrup, no ingredients list you need a chemistry degree to read.
What You’ll Need
| Ingredient | Amount | Notes |
|---|---|---|
| Fresh strawberries | 2 cups, hulled | Frozen works too, just thaw first |
| Ripe mango | 1 large, cubed | About 1.5 cups |
| Kiwi | 3, peeled | Skip if you want a simpler 2-flavor version |
| Plain Greek yogurt | 1 cup | Full-fat gives the creamiest texture |
| Honey or maple syrup | 3-4 tbsp | Start with less, taste, add more |
| Fresh lime juice | 2 tbsp | Brightens everything up |
| Fresh mint | Small handful, optional | Just for the kiwi layer |
Tools You’ll Need
- Blender or food processor
- Popsicle molds (mine hold about 3 oz each)
- Popsicle sticks
- Measuring cups
- Silicone spatula
- Fine mesh strainer (optional, for the kiwi seeds)
Pro Tips
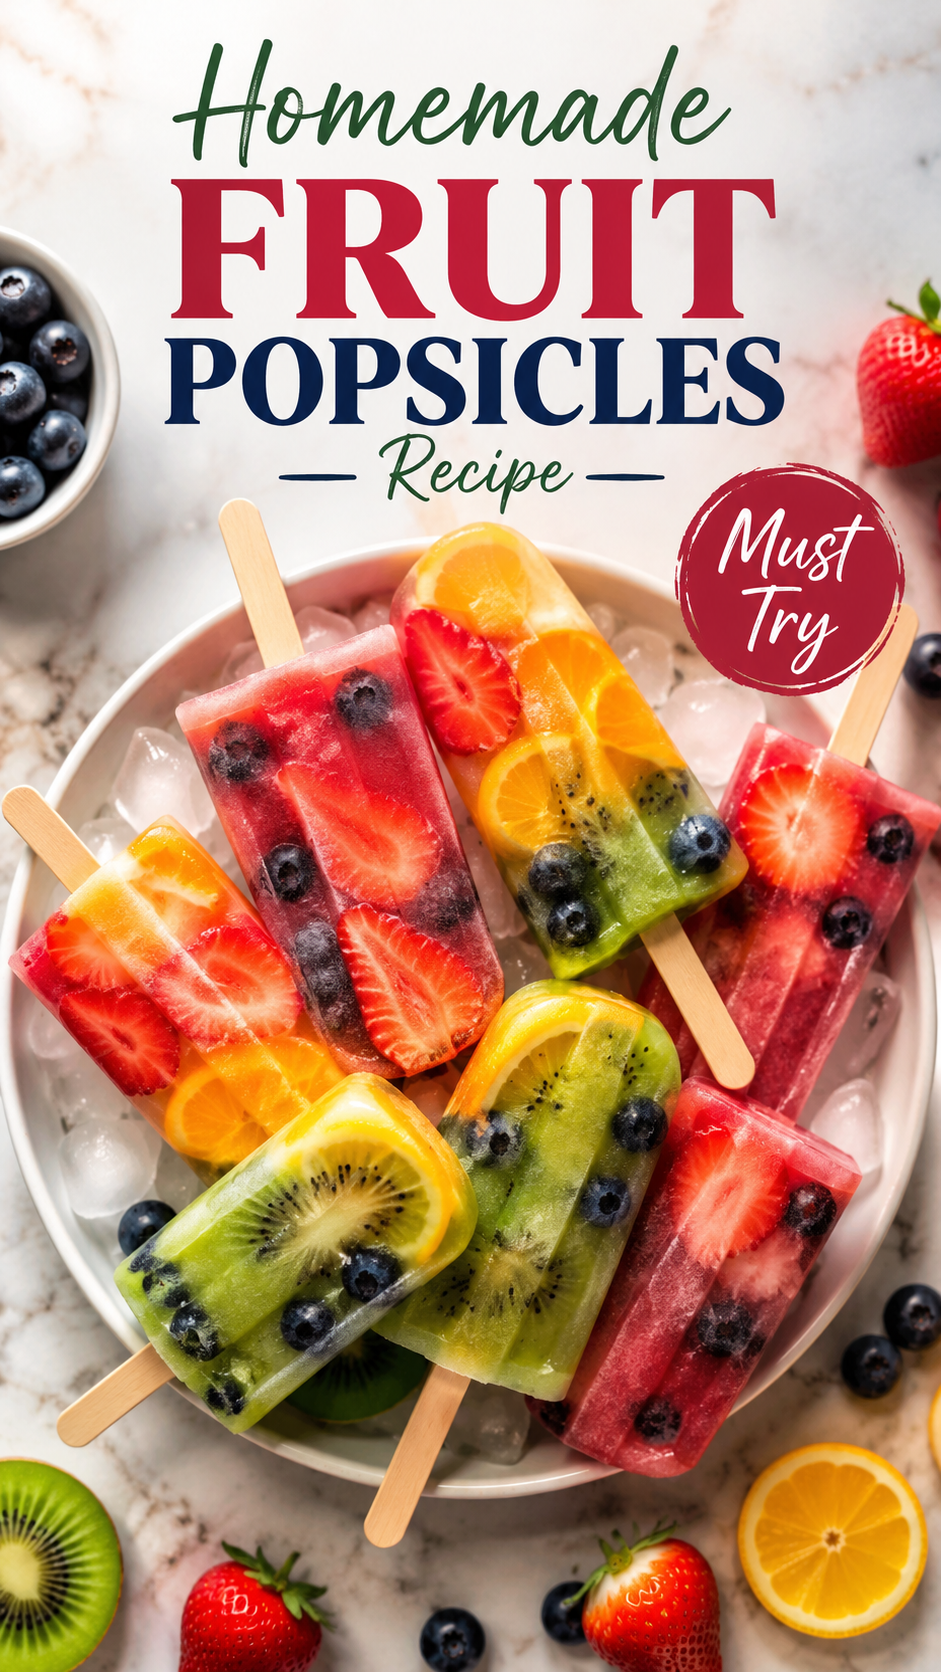
- Freeze in layers if you want that striped look. Pour one flavor in, freeze for 30-45 minutes until set, then add the next. It’s a little slower but it makes these look way more impressive than the effort required.
- Don’t skip the lime juice. Freezing mutes sweetness and flavor in general, so that little hit of acid keeps things from tasting flat once frozen.
- Underfill your molds slightly. Liquid expands as it freezes. Fill to about a quarter inch below the top or you’ll get a mess on your hands.
- Run the mold under warm water for 10-15 seconds to unmold. Do not yank on the stick. I learned this one the hard way and lost a popsicle to the kitchen floor.
- Taste your fruit before you add sweetener. Ripe, in-season fruit sometimes needs zero honey. Sad, sour popsicles are avoidable.
How to Make Homemade Fruit Popsicles
Step 1: Blend the Strawberry Layer
Add the strawberries, half the yogurt, half the honey, and half the lime juice to your blender. Blend until smooth, about 30 seconds.
Taste it. Adjust sweetness if needed.
Step 2: Blend the Mango Layer
Rinse out your blender. Add the mango, remaining yogurt, remaining honey, and remaining lime juice.
Blend until smooth and creamy. This one usually needs the least sweetener since mango is already a sugar bomb in the best way.
Step 3: Blend the Kiwi Layer
Rinse the blender again. Add the kiwi and mint, and blend until smooth.
If you don’t love kiwi seeds in your teeth, strain this one through a fine mesh strainer before moving on.
Step 4: Fill Your Molds
Pour a layer of strawberry mixture into each mold, filling about a third of the way. Freeze for 30-45 minutes, just until set but not rock solid.
Add the mango layer. Freeze another 30-45 minutes.
Top with the kiwi layer, insert your sticks, and freeze the whole thing for at least 4 hours, though overnight is better.
Step 5: Unmold and Eat
Run warm water over the outside of the mold for 10-15 seconds. Gently wiggle each popsicle out by the stick.
Eat immediately, or transfer to a freezer bag for later.
Substitutions & Variations
| Original | Swap | Why |
|---|---|---|
| Greek yogurt | Coconut yogurt or coconut milk | Dairy-free, and honestly just as creamy |
| Honey | Maple syrup or agave | Vegan-friendly |
| Strawberry/mango/kiwi | Watermelon and lime only | Simpler, even fewer ingredients |
| Fresh fruit | Frozen fruit, thawed | Works great and is often cheaper |
| Plain popsicles | Add a splash of coconut cream on top layer | Tastes like a tropical vacation |
Make-Ahead Tips
These are basically the definition of a make-ahead recipe since they need to freeze anyway.
Make a double batch on a Sunday and you’ve got snacks covered for two weeks. Once fully frozen and unmolded, transfer them into a freezer-safe bag so you can reuse your molds for the next round.
Estimated Nutrition
Estimated per popsicle, based on a standard 3 oz mold size.
| Nutrient | Amount |
|---|---|
| Calories | ~55 |
| Protein | 2g |
| Carbohydrates | 11g |
| Sugar | 8g |
| Fat | 0.5g |
These numbers are estimates and will shift depending on the exact fruit, sweetener, and yogurt you use. Before publishing or sharing this as fact, run the real ingredients you used through Cronometer to get accurate figures.
Pairing Suggestions
These are a great follow-up to a BBQ or a spicy meal since the fruit cools everything down.
Serve alongside iced tea or fresh lemonade for a full “hot day” spread. They also work as a light dessert after tacos, grilled chicken, or basically anything off the grill.
If you’re doing a pool day or a backyard hangout, set out a few different flavor combos and let people grab whichever one looks best. It turns a simple snack into a little bit of an event.
They also make a surprisingly good breakfast on a hot morning, though I’ll deny saying that if you quote me on it.
Storage & Reheating
There’s no reheating a popsicle, but here’s how to keep them from turning into freezer burn casualties.
Once fully frozen, pop them out of the molds and store them in a freezer bag or airtight container. Press out as much air as you can before sealing.
They’ll keep well for up to 2 months, though honestly they never last that long in my freezer.
FAQ
Can I use frozen fruit instead of fresh?
Yes, just thaw it first so your blender doesn’t struggle. Frozen fruit is often cheaper and just as good here.
Why won’t my popsicle sticks stay upright?
Freeze the bottom layer until it’s set enough to hold the stick in place before adding more liquid on top. If your mold has a built-in lid with stick holders, use that instead.
Do I need a fancy popsicle mold?
No. Small paper cups or an ice cube tray with toothpicks work in a pinch.
Can I make these with just one fruit instead of three?
Absolutely. Skip the layering and just blend your favorite fruit with yogurt, honey, and lime for a single-flavor version.
Can my kids help make these?
This is honestly one of the easiest recipes to hand off to kids. Blending and pouring are pretty much foolproof, and they’ll be extra proud to eat something they made themselves.
Why is my popsicle mixture separating in the mold?
This usually happens if the mixture wasn’t blended long enough or the yogurt wasn’t fully incorporated. Give it an extra 15-20 seconds in the blender and it should stay smooth.
Can I make these without yogurt at all?
You can, but expect a harder, more ice-pop texture instead of the creamy version. If you skip it, add a tablespoon of honey to help soften the texture slightly.
How long does the layering process actually take?
Active time is maybe 15 minutes total. The rest is just waiting on the freezer, so plan to start this the night before you actually want to eat them.
Wrapping Up
So that’s it. Real fruit, a blender, and a freezer that does the hard part for you.
Silas has officially requested these become a permanent summer staple, and I’m not mad about it.
Make a batch this week and let me know how yours turned out in the comments below. I’d love to hear what fruit combos you tried, and if you run into any questions along the way, just ask.