I made this chicken three times in one week and my husband didn’t even complain about repeats.
That’s how you know it’s a keeper.
This is Honey Garlic Butter Chicken Thighs, and it’s the kind of recipe that looks like it came from a restaurant menu but actually takes about 30 minutes and one pan.
The sauce is sticky, buttery, a little garlicky, and just sweet enough. It soaks into rice like it was made for it.
Let’s get into it.
What You’ll Need
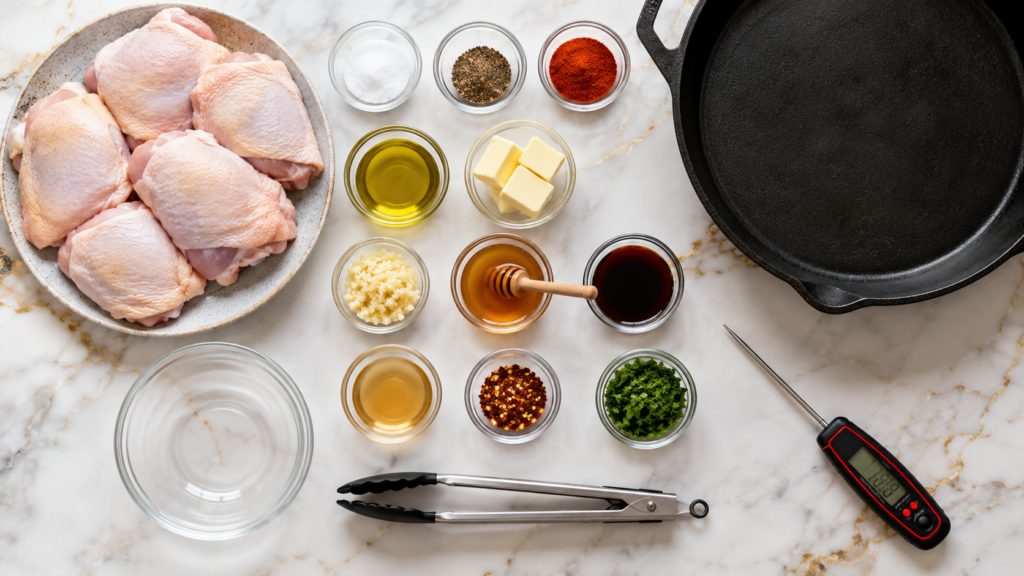
Here’s everything you’ll need to pull this together.
For the chicken:
- 6 bone-in, skin-on chicken thighs (about 2 lbs)
- 1 tsp salt
- 1/2 tsp black pepper
- 1/2 tsp smoked paprika
- 2 tbsp olive oil
For the honey garlic butter sauce:
- 4 tbsp unsalted butter
- 6 cloves garlic, minced
- 1/3 cup honey
- 3 tbsp low-sodium soy sauce
- 1 tbsp apple cider vinegar
- 1/2 tsp red pepper flakes (optional, but I always add it)
- 2 tbsp chopped fresh parsley, for garnish
That’s it. Nothing weird, nothing you have to hunt down at a specialty store.
Tools You’ll Need
- A large cast iron or oven-safe skillet
- Tongs
- A small mixing bowl
- A meat thermometer (not required, but it saves you from guessing)
How to Make Honey Garlic Butter Chicken Thighs
- Preheat your oven to 400°F.
- Pat the chicken thighs completely dry with paper towels. This step matters more than you’d think.
- Season both sides with salt, pepper, and smoked paprika.
- Heat the olive oil in your skillet over medium-high heat.
- Place the chicken skin-side down and let it sit, undisturbed, for 6 to 7 minutes until the skin turns deep golden brown.
- Flip the thighs and cook the other side for 3 more minutes.
- Remove the chicken and set it aside on a plate.
- Lower the heat to medium. Add the butter and garlic to the same skillet and stir for about 30 seconds, just until fragrant.
- Whisk in the honey, soy sauce, apple cider vinegar, and red pepper flakes.
- Let the sauce simmer for 2 minutes, then return the chicken to the pan, skin-side up, spooning some sauce over the top.
- Transfer the whole skillet to the oven and bake for 15 to 18 minutes, until the chicken hits 165°F internally.
- Let it rest for 5 minutes before serving. This step is not optional either.
- Spoon extra sauce over the top and sprinkle with parsley.
Pro Tips
A few things I learned the hard way so you don’t have to.
- Dry chicken skin is non-negotiable. If the skin is even a little wet, it won’t crisp up. Paper towels are your best friend here.
- Don’t touch the chicken while it’s searing. I know it’s tempting. Let it sit and build that crust.
- Use a splatter screen if you have one. Skin-side searing gets messy fast. 🍳
- Taste the sauce before it goes back in the oven. If it’s too sweet for you, add another splash of vinegar or soy sauce.
- Buy thighs that are similar in size. It keeps the cooking time even, so you’re not left with one overcooked piece and one raw one.
Substitutions and Variations
This recipe is flexible, so make it work for what you’ve got.
| Original | Swap |
|---|---|
| Bone-in chicken thighs | Boneless thighs (reduce bake time by 5-6 minutes) |
| Honey | Maple syrup |
| Soy sauce | Coconut aminos (for gluten-free) |
| Smoked paprika | Regular paprika or chili powder |
| Butter | Ghee, for a slightly nutty flavor |
Want it spicier? Double the red pepper flakes and add a chopped jalapeño to the sauce.
Want it more citrusy? Add the zest of one lemon right at the end.
Make Ahead Tips
You can season the chicken up to 24 hours ahead and keep it covered in the fridge. This actually makes the flavor even better.
The sauce can also be made a day in advance. Just reheat it gently in the skillet before adding the seared chicken back in.
Nutritional Breakdown (Per Serving)
This recipe makes 4 servings.
| Nutrient | Amount |
|---|---|
| Calories | ~410 |
| Protein | 27g |
| Fat | 26g |
| Carbs | 18g |
| Sugar | 15g |
Numbers will shift a bit depending on the exact size of your chicken thighs and how much sauce you spoon on.
Diet Swaps
- Low carb: Swap the honey for a sugar-free maple alternative.
- Dairy-free: Use olive oil instead of butter in the sauce.
- Gluten-free: Use tamari or coconut aminos instead of regular soy sauce.
What to Pair It With
This chicken loves rice. Jasmine rice especially, since it soaks up every drop of that sauce.
Steamed broccoli or a simple cucumber salad on the side balances out the richness really well.
If you’re feeding a crowd, garlic bread on the side is never a bad call.
Time-Saving Tips
- Mince your garlic the night before and store it in the fridge.
- Mix your dry seasonings ahead of time in a small jar.
- Use a splatter screen so you’re not stopping to wipe down the stove mid-cook.
Leftovers and Storage
Store leftovers in an airtight container in the fridge for up to 4 days.
To reheat, warm it gently in a skillet over low heat with a splash of water or chicken broth so the sauce doesn’t dry out.
You can also freeze it for up to 3 months. Thaw overnight in the fridge before reheating.
FAQ
Can I use chicken breasts instead of thighs?
Yes, though the cook time will be shorter and breasts dry out more easily, so keep an eye on the internal temperature.
Do I have to sear the chicken first?
I’d really recommend it. That crispy skin and golden color make a huge difference in both flavor and texture.
Can I make this on the stovetop only, without the oven?
Yes. Just cover the skillet and let it simmer on low for about 12 to 15 minutes, flipping once, until the chicken is fully cooked through.
Is this recipe very spicy?
Not at all as written. The red pepper flakes add warmth, not heat, but you can leave them out completely if you prefer.
Can I double the recipe?
Definitely, just make sure your skillet is large enough, or use two pans so the chicken isn’t crowded.
Wrapping Up
This chicken has become one of those recipes I fall back on whenever I want dinner to feel like an event without actually turning my kitchen upside down.
The sauce alone is worth making this on repeat.
Give it a try this week, and let me know in the comments how it turned out for you. I’d love to hear if you added your own twist or if you have questions before you get started. 🧡