
So it snowed last week and my neighbor’s kids were out there eating handfuls of it straight off the lawn.
I get it. I did the same thing as a kid.
But there’s a version of that childhood memory that’s actually good, and I mean genuinely tastes like ice cream. Not “snow with sugar on it.” Real, creamy, scoopable ice cream made from the stuff falling outside your window.
I made a batch last weekend on a whim and it disappeared in ten minutes flat.
Here’s exactly how I made it.
What You’ll Need
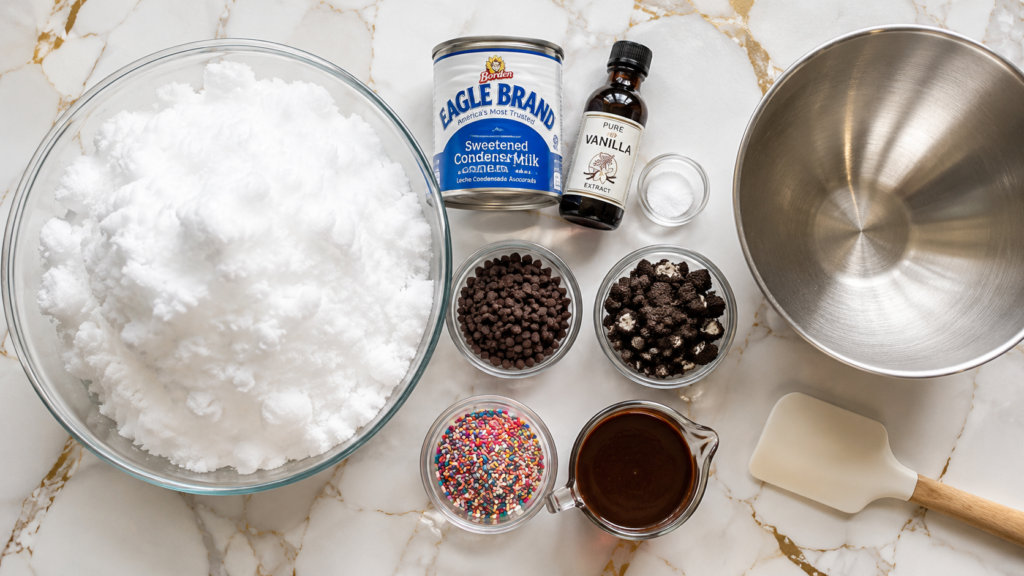
- 8 cups fresh, clean snow (packed lightly, not scooped from the ground)
- 1 can (14 oz) sweetened condensed milk
- 1 tablespoon vanilla extract
- A tiny pinch of salt
That’s it. Four ingredients.
Optional mix-ins:
- Mini chocolate chips
- Crushed cookies
- Sprinkles
- A drizzle of chocolate or caramel sauce
Tools You’ll Need
- A large mixing bowl (metal or glass stays cold longer)
- A big spoon or rubber spatula
- Measuring cups
- Small bowls for serving (chilled, if you can manage it)
Why Snow Actually Works Here 🌨️
Snow is basically tiny ice crystals with a ton of air trapped between them.
That air pocket structure is exactly what gives real ice cream its light, fluffy texture instead of turning into a solid ice block.
So when you fold sweetened condensed milk into snow, you’re not just making a novelty. You’re recreating the same air-to-fat ratio that a $400 ice cream machine is trying to achieve.
Wild, right?
How to Make Snow Ice Cream
Step 1: Collect the Right Snow
Go out right after it snows, ideally within the first hour or two.
Skip the top inch if it’s been sitting a while, and definitely skip snow near roads, sidewalks, or anywhere pets go.
Fresh, fluffy, untouched snow from a clean patch of yard is what you want.
Step 2: Bring It In Fast
Pack your snow into a large bowl and get it inside quickly.
Snow melts faster than you’d think once it’s away from the cold air, so don’t let it sit on the counter.
Step 3: Mix in the Condensed Milk
Pour the sweetened condensed milk over the snow.
Add the vanilla and that tiny pinch of salt.
Step 4: Fold, Don’t Stir
Use a spoon or spatula and fold everything together gently.
Stirring too hard or too fast melts the snow before it has a chance to soak up the milk mixture, and you’ll end up with soup instead of ice cream.
Step 5: Add Your Mix-Ins
Fold in chocolate chips, crushed cookies, or whatever you’re using at this point.
Step 6: Serve Immediately
This one doesn’t wait around.
Scoop it into bowls and eat it right away while the texture is still light and fluffy.
Pro Tips
- Chill your bowl first. Stick it in the freezer for 10 minutes before you start. It keeps the snow from melting the second it hits the bowl.
- Use the freshest snow you can find. Snow that’s been sitting for a day or two loses that airy texture and turns dense.
- Don’t overmix. I made this mistake the first time and ended up with sweet milk soup. Fold gently, stop as soon as it looks combined.
- Taste as you go. Some snow is denser than others, so you might need a splash more condensed milk to get the right sweetness and texture.
- Work fast. Have your mix-ins measured out and ready before you bring the snow inside.
Substitutions and Variations
| Original | Swap | Notes |
|---|---|---|
| Sweetened condensed milk | Coconut condensed milk | Dairy-free, still creamy |
| Vanilla extract | Almond or maple extract | Changes the whole flavor profile |
| Chocolate chips | Crushed candy canes | Great for a holiday version |
| Plain | Cocoa powder | Stir in 1-2 tablespoons for chocolate snow ice cream |
| Plain | Fruit puree | Swirl in strawberry or mango puree right before serving |
You can really take this in any direction. My husband likes it with a spoonful of peanut butter folded in, which sounds strange until you try it.
Make Ahead Tips
Honestly, this one isn’t a make ahead recipe, and that’s kind of the whole point.
Snow ice cream is best eaten within minutes of making it.
What you can do ahead of time is measure out your condensed milk, vanilla, and mix-ins so everything’s ready the second snow starts falling.
A Few Extra Details
Nutrition (roughly, per serving): About 180-220 calories depending on your mix-ins, mostly from the condensed milk. This isn’t a health food, and it’s not trying to be.
For a lighter version: Use half the amount of condensed milk and add a splash of milk instead. It won’t be as sweet, but it stretches further.
Pairing idea: Serve it right after a bowl of chili or soup. The temperature contrast is one of those small things that makes a regular weeknight feel a little special.
Time efficiency: The whole process takes under 10 minutes once the snow is inside, so there’s no reason to rush the snow collecting part.
Leftovers and Storage
There’s really no “leftover” scenario here since it melts within an hour or two at room temperature.
If you somehow have extra, you can pop it in the freezer in an airtight container for up to a day.
It won’t be quite as fluffy when you pull it back out, but it’ll still taste good.
FAQ
Is it actually safe to eat snow? Fresh snow from a clean area, collected shortly after it falls, is generally fine to eat. Avoid the first layer that falls if there’s been air pollution nearby, and always skip snow near roads or anywhere animals have been.
Why did my snow ice cream turn out watery? You either used snow that had already started melting, or you overmixed it. Both cause the same soupy result.
Can I use crushed ice instead of snow? Not really. Crushed ice doesn’t have the same airy structure, so it turns into more of a slushy than ice cream.
How much snow do I actually need? Start with 8 cups. Snow packs down a lot once it’s mixed, so it looks like less than you’d expect.
Can kids help make this? Yes, and honestly this is one of the easiest recipes to hand off to kids. The folding step especially.
Wrapping Up
Next time it snows, skip the plain snowball fight and turn that snow day into something you’ll actually remember.
Four ingredients, ten minutes, and a dessert that feels like a tiny bit of magic from your own backyard.
I’d love to hear how yours turns out. Drop a comment below with your mix-in combo, or if you ran into the watery texture problem, tell me what happened. I read every single one.