I have a rule. No desserts in the freezer past 24 hours.
This fudge lasted six.
That’s it. That’s the whole review. But stick with me, because this recipe is genuinely one of the easiest things I’ve ever made, and I need you to know exactly how it happened.
No candy thermometer. No standing over a stove stirring for 20 minutes praying it doesn’t seize up. Just condensed milk, chocolate, and butter, melted together and poured into a pan.
Three ingredients. One bowl. Ten minutes of actual work.
I honestly thought there had to be a catch. There wasn’t.
Why This Fudge Works So Well
Sweetened condensed milk is basically a shortcut for every candy-maker’s hardest job: getting sugar to the exact right consistency without it turning grainy or burning.
Traditional fudge needs a thermometer and a lot of patience. This version skips all of it because the condensed milk is already cooked down and sweetened.
That means the fudge sets up soft, creamy, and almost fudgy-truffle in texture. 😋
It’s the kind of thing that looks like you spent hours on it. You didn’t.
What You’ll Need
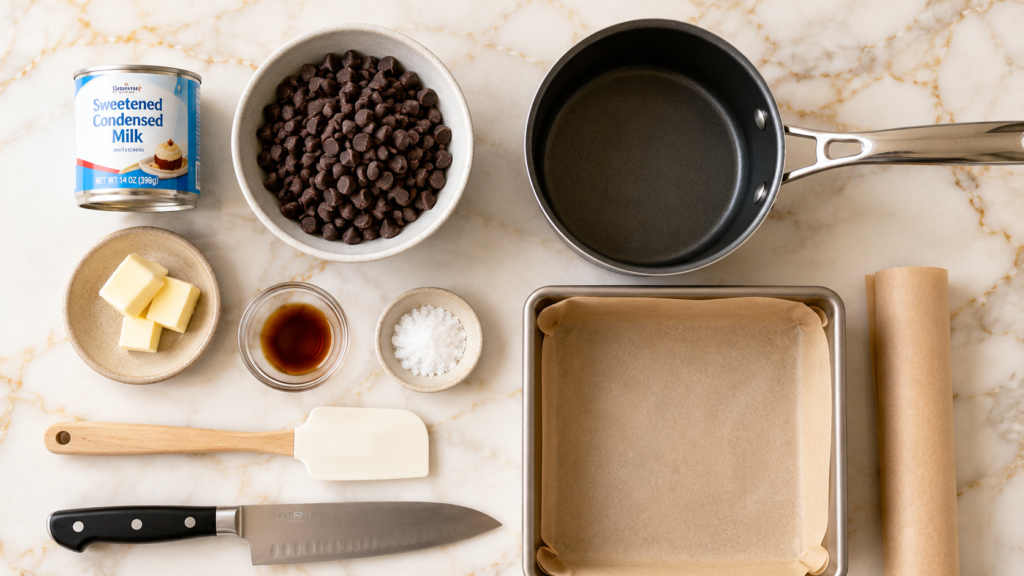
- 1 can (14 oz) sweetened condensed milk
- 2 cups semi-sweet chocolate chips (or chopped chocolate bar)
- 2 tablespoons unsalted butter
- 1 teaspoon vanilla extract
- Pinch of flaky sea salt (optional, but really elevates it)
That’s genuinely all you need for the base recipe. Everything else is optional add-ins.
Tools You’ll Need
- Medium saucepan (or microwave-safe bowl)
- 8×8 inch baking pan
- Parchment paper
- Rubber spatula
- Sharp knife for cutting
Nothing fancy. No stand mixer, no thermometer, no special pans.
Full Instructions
Step 1: Prep your pan. Line an 8×8 pan with parchment paper, leaving an overhang on two sides. This makes lifting the fudge out later so much easier.
Step 2: Melt everything together. Combine the condensed milk, chocolate chips, and butter in a saucepan over low heat.
Stir constantly. This part matters more than you’d think.
Step 3: Watch for the moment. The mixture will go from separate ingredients to one glossy, thick mass in about 5 minutes.
Once it’s smooth and no chocolate streaks remain, pull it off the heat immediately.
Step 4: Add the finishing touches. Stir in vanilla extract. If you’re adding nuts, dried fruit, or crushed cookies, fold them in now.
Step 5: Pour and smooth. Pour the mixture into your prepared pan. Use the spatula to spread it evenly into the corners.
Sprinkle flaky salt on top if using.
Step 6: Chill. Refrigerate for at least 2 hours, or until firm to the touch.
Step 7: Cut and serve. Lift the fudge out using the parchment overhang. Cut into small squares with a sharp knife.
Wipe the knife between cuts for clean edges.
Pro Tips From My Kitchen
- Low and slow wins every time. High heat is the #1 reason fudge turns grainy. Keep it on low the entire time, even if it feels slow.
- Use real chocolate chips, not chocolate-flavored candy melts. The fat content matters for how the fudge sets.
- Don’t skip the parchment paper. Fudge sticks to pans in a way that will genuinely ruin your day.
- Let it fully chill before cutting. I know it’s tempting. Cutting too early gives you a mess instead of squares.
- Room temperature butter blends smoother than cold butter straight from the fridge.
Substitutions and Variations
| Swap This | For This | Result |
|---|---|---|
| Semi-sweet chocolate | White chocolate | Sweeter, milder fudge |
| Dairy condensed milk | Coconut condensed milk | Dairy-free version |
| Butter | Coconut oil | Slightly firmer texture |
| Plain | Add crushed pretzels | Salty-sweet crunch |
| Plain | Swirl in peanut butter | Classic combo, extra rich |
You can genuinely turn this into ten different desserts just by changing what you fold in at the end.
Try crushed peppermint candies around the holidays. Or espresso powder for a mocha version that tastes way fancier than it is.
Make Ahead Tips
This fudge is honestly built for making ahead.
- Make it up to 5 days in advance and store covered in the fridge.
- It also freezes beautifully for up to 3 months.
- Cut into squares before freezing so you can grab just what you need.
It’s one of those desserts that gets better after a day in the fridge, once all the flavors settle.
Leftovers and Storage
Fridge: Store in an airtight container for up to 2 weeks. It actually holds up better than most desserts I make.
Freezer: Wrap squares individually in parchment, then store in a freezer bag for up to 3 months.
Room temperature: This fudge can sit out for a few hours, but it softens fast. Keep it chilled if your kitchen runs warm.
Nutritional Notes and Pairing Ideas
Each square (based on a 24-piece batch) comes in around 90-110 calories, depending on your mix-ins.
For a lighter version, sugar-free chocolate chips and light condensed milk both work fine without changing the texture much.
Pairing ideas:
- Espresso or strong coffee
- A glass of cold milk (the classic move)
- Fresh raspberries for cutting the sweetness
FAQ
Can I use milk chocolate instead of semi-sweet? Yes, but the fudge will be noticeably sweeter. If you go this route, add an extra pinch of salt to balance it.
Why did my fudge turn out grainy? This usually means the heat was too high, or the mixture got overheated before the chocolate fully melted. Keep it low and slow.
Can I double this recipe? Absolutely. Just use a 9×13 pan instead of 8×8, and give it a little extra time in the fridge to set.
Does this need to be refrigerated? Yes. Because it’s dairy-based, it needs to stay chilled until you’re ready to serve.
Can I make this without a stove? Yes. Melt everything in the microwave in 30-second bursts, stirring between each one.
Wrapping Up
This fudge is proof that the best desserts don’t need to be complicated.
Three ingredients. One pan. Something that tastes like you spent an afternoon on it, when really it took ten minutes of actual effort.
Make it this week. Try one of the variations. Then come back and tell me what you added, because I genuinely want to know.
Drop a comment below with your results, your swaps, or any questions you’ve got along the way. I read every single one.