I made this on a random Tuesday and my husband walked into the kitchen, stopped, and just said “what IS that smell.”
That’s the power of garlic and sourdough sharing an oven.
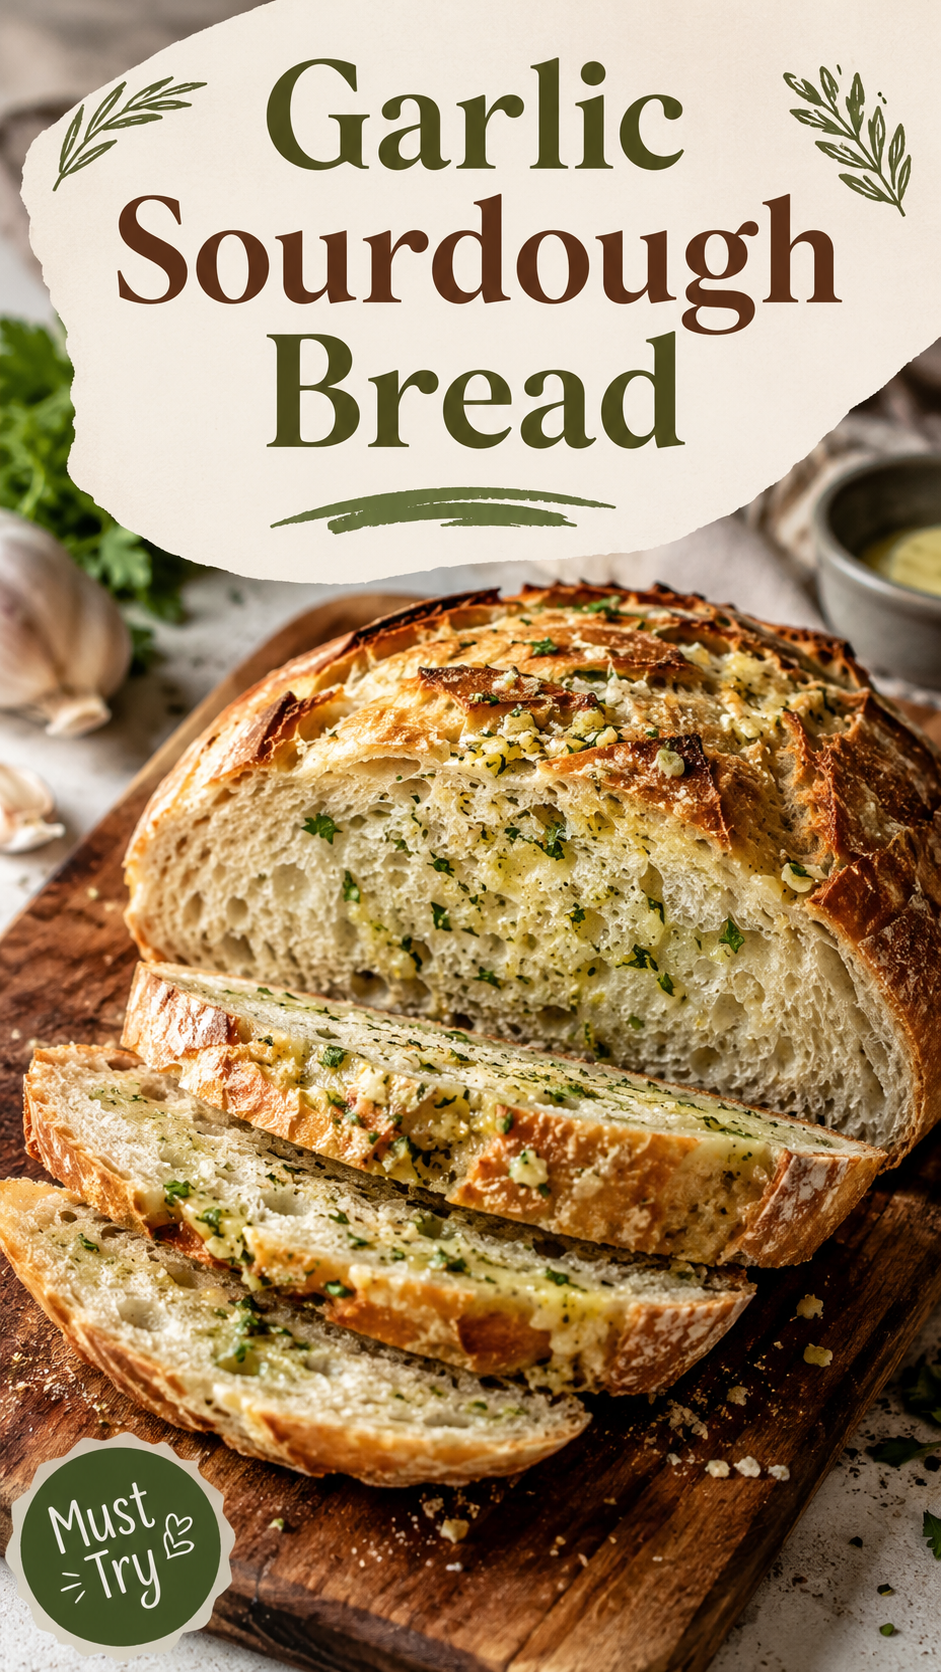
This isn’t your average garlic bread. We’re talking a real sourdough loaf, tangy and chewy on the inside, packed with roasted garlic and herby butter, with a crust that shatters when you cut into it.
It looks like something from a fancy bakery. It’s honestly not that hard to make.
And once you try it warm, with the butter still melting into the crumb, you’re going to understand why I’ve made it four times this month alone. 🧄
Let’s get into it.
What You’ll Need
Here’s everything going into this loaf:
- 1 active sourdough starter (100g, fed and bubbly)
- 375g bread flour
- 25g whole wheat flour
- 300g water, room temp
- 9g fine sea salt
- 1 whole head of garlic (for roasting)
- 1 tbsp olive oil (for roasting the garlic)
- 6 tbsp unsalted butter, softened
- 3 cloves fresh garlic, minced
- 2 tbsp fresh parsley, chopped
- 1 tsp flaky sea salt (for topping)
- Extra flour for shaping
Simple stuff. Nothing you need to hunt down at three different stores.
Tools You’ll Need
- Kitchen scale (seriously, don’t skip this one for sourdough)
- Large mixing bowl
- Dutch oven with lid
- Bench scraper
- Parchment paper
- Sharp knife or bread lame for scoring
- Small saucepan
Pro Tips
A few things I learned the hard way so you don’t have to:
- Roast the garlic the night before. It takes almost zero effort and it means one less thing standing between you and warm bread the next day.
- Don’t rush your starter. If it’s not doubling in size and passing the float test, your bread won’t rise properly. Feed it again and wait a few more hours.
- Butter goes in cold-ish, not melted. Softened butter mixes into the dough without turning it into a greasy mess. Melted butter will make your dough slide around and won’t distribute evenly.
- Score deep and confident. A shallow, hesitant score won’t let the bread expand properly in the oven. One clean, deep cut works better than five nervous little ones.
- Let it cool before slicing. I know. I know. But cutting into hot sourdough turns the inside gummy instead of light and airy. Give it at least 45 minutes.
Instructions
Step 1: Roast the Garlic
Preheat your oven to 400°F. Slice the top off the whole garlic head, drizzle with olive oil, wrap it in foil, and roast for 40-45 minutes until soft and golden. Let it cool, then squeeze the cloves into a bowl and mash them into a paste.
Step 2: Mix the Dough
In a large bowl, combine your active starter and water. Mix until the starter dissolves a bit. Add both flours and mix until no dry patches remain. Cover and let it rest for 30 minutes (this is called the autolyse, and it makes a real difference).
Step 3: Add Salt and Garlic
Sprinkle the salt over the dough along with half of your roasted garlic paste. Squeeze and fold the dough with wet hands until fully combined.
Step 4: Bulk Ferment
Cover the bowl and let it sit at room temperature for 4-6 hours. Every 30 minutes for the first 2 hours, do a set of stretch and folds (grab one side, stretch it up, fold it over the top, rotate the bowl, repeat 4 times). The dough should grow noticeably in size and feel jiggly and full of air by the end.
Step 5: Make the Garlic Butter
While the dough ferments, mix your softened butter with the remaining roasted garlic paste, minced fresh garlic, and chopped parsley. Set aside at room temp.
Step 6: Shape the Dough
Turn the dough onto a lightly floured surface. Shape it into a tight round by pulling the edges under itself repeatedly. Place it seam-side up in a floured bowl or banneton.
Step 7: Cold Proof
Cover and refrigerate overnight, or at least 8 hours. This step builds flavor and makes the dough much easier to score and handle.
Step 8: Preheat and Score
The next day, preheat your oven to 500°F with the Dutch oven inside for 45 minutes. Flip your dough onto parchment paper, spread half the garlic butter across the top, and score a deep line down the center.
Step 9: Bake
Carefully lower the dough (with parchment) into the hot Dutch oven. Cover and bake for 20 minutes. Remove the lid, drop the temperature to 450°F, and bake for another 20-25 minutes until deeply golden.
Step 10: Finish and Cool
Pull the bread out and immediately brush the remaining garlic butter over the crust. Sprinkle with flaky salt. Let it cool on a wire rack for at least 45 minutes before slicing.
Substitutions and Variations
| Original | Swap | Notes |
|---|---|---|
| Sourdough starter | Instant yeast (2 tsp) | Won’t be true sourdough, but still tasty and much faster |
| Bread flour | All-purpose flour | Slightly less chewy, still works fine |
| Whole wheat flour | More bread flour | Slightly lighter crumb, less nutty flavor |
| Fresh garlic | Garlic powder (1 tbsp) | Faster, but you lose that roasted depth |
| Parsley | Chives or rosemary | Rosemary makes it feel extra cozy in fall |
| Unsalted butter | Vegan butter | Works great for a dairy-free version |
Make Ahead Tips
You can roast the garlic up to 3 days ahead and keep it in the fridge. The garlic butter can also be made 2-3 days in advance. The cold proof step in the recipe already builds in an overnight rest, so honestly, most of this bread is made ahead by design.
Leftovers and Storage
Once fully cooled, store the bread in a paper bag or wrapped in a clean kitchen towel at room temperature for up to 2 days. For longer storage, slice it first and freeze in a zip top bag for up to 3 months.
To bring frozen slices back to life, toast them straight from frozen or wrap in foil and warm in a 350°F oven for 10 minutes.
Skip storing it in plastic at room temp. The crust will turn soft and sad within hours. 😔
Nutrition (Per Slice, Makes 12 Slices)
| Nutrient | Amount |
|---|---|
| Calories | 195 |
| Carbohydrates | 28g |
| Protein | 4g |
| Fat | 7g |
| Fiber | 1.5g |
| Sodium | 310mg |
Estimated values, will vary based on exact ingredients used.
FAQ
Can I make this without a Dutch oven?
Yes, but the crust won’t be quite as crisp. Bake on a preheated baking sheet or pizza stone and place a pan of water on the oven’s lower rack to create steam.
My starter isn’t very active. Can I still use it?
I’d feed it once or twice more before baking with it. A sluggish starter usually means a dense, flat loaf, and after all this work, you want the real thing.
Can I add cheese to this?
Absolutely. Fold in a cup of shredded parmesan or asiago along with the garlic paste in Step 3. Cheesy garlic sourdough is a whole different level.
Why does my bread taste bland even with all this garlic?
Usually it’s the salt getting skipped or under-measured, or the roasted garlic paste not being fully mixed through the dough. Taste your garlic butter on its own before spreading it and adjust from there.
Do I have to do the cold proof overnight?
You don’t have to, but it makes a big difference in flavor and it makes scoring so much easier. If you’re short on time, a minimum 2 hour room temp proof will still work, just expect a milder tang.
Wrapping Up
This bread turns a boring weeknight into something that feels special, and it’s genuinely one of those recipes where the effort pays off tenfold the second you smell it baking.
Make it once and I promise your kitchen is going to smell like a bakery for the rest of the day.
If you try this garlic sourdough, come back and leave a comment telling me how it turned out. I want to know if your husband reacted the same way mine did. 🍞
And if you run into any questions along the way, drop them below. I read every single one.