I used to spend close to $6 a day on iced coffee. Every single day. For years.
Silas finally sat me down and did the math out loud, and I genuinely did not want to hear it.
So I started making it at home, and here’s the part nobody tells you: it’s actually better than what I was buying. Not “pretty close.” Better.
This is the exact recipe I make almost every morning now. It takes about five minutes of actual effort, and most of that is just waiting for ice.
Why This One Works
Most homemade iced coffee tastes weak and watery. That’s not your fault, it’s just how the math works.
Hot coffee poured over ice melts the ice fast and dilutes everything. You end up with sad brown water by the time you’re halfway through the glass.
This recipe skips that problem entirely. You’ll brew it stronger than normal on purpose, so when it hits the ice, it balances out instead of turning into flavored water.
That’s really the whole secret. Everything else is just details.
What You’ll Need
For the coffee:
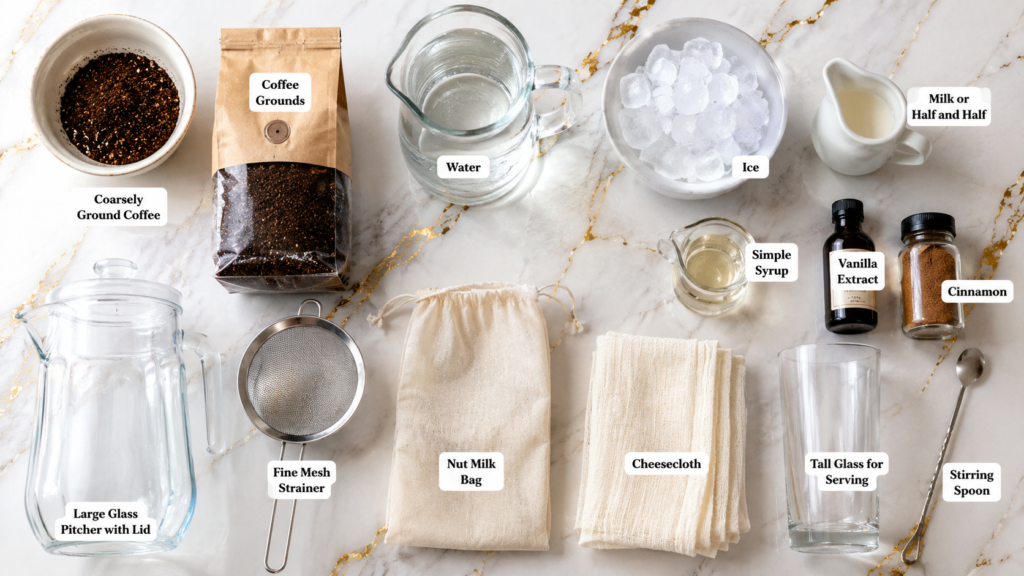
- 1/2 cup coarsely ground coffee (medium-dark roast works best)
- 4 cups cold or room temperature water
- Ice, a lot of it
For serving (adjust to taste):
- 1/4 cup milk or half and half, or your favorite milk alternative
- 1 to 2 tablespoons simple syrup or your sweetener of choice
- Optional: a splash of vanilla extract or a pinch of cinnamon
Tools You’ll Need
- A large pitcher or jar with a lid
- A fine mesh strainer or a nut milk bag
- Cheesecloth (optional, but it makes straining easier)
- A tall glass for serving
- A stirring spoon or straw
Pro Tips
- Grind your coffee coarse. Fine grounds turn this into sludge and make straining a nightmare. Think sea salt, not powder.
- Don’t rush the steep time. Twelve hours minimum. I know it’s tempting to check early, but the flavor genuinely needs that time to pull out slow.
- Make a double batch. This stuff keeps in the fridge for up to two weeks, so there’s no reason to only make one glass at a time.
- Sweeten it while it’s still concentrated, before you add ice. Sugar dissolves way better in liquid that isn’t freezing cold.
- Save your coffee ice cubes trick for later batches. Freeze leftover brewed coffee into cubes so your next glass never gets watered down, even as the ice melts.
How to Make It
Step 1: Combine the Coffee and Water
Add your coarsely ground coffee to a large pitcher or jar. Pour the cold water over it and give it a gentle stir, just enough to make sure all the grounds are wet.
Step 2: Let It Steep
Cover the pitcher and let it sit at room temperature, or in the fridge if your kitchen runs warm, for 12 to 24 hours. Longer steeping means a stronger, smoother concentrate.
Step 3: Strain It
Pour the mixture through a fine mesh strainer lined with cheesecloth, or through a nut milk bag, into a clean container. This step takes patience. Let gravity do the work instead of pressing on the grounds, which can push bitterness through.
Step 4: Build Your Glass
Fill a tall glass with ice. Pour in about 1/2 cup of the coffee concentrate.
Step 5: Add Milk and Sweetener
Top with milk and your sweetener of choice. Stir well.
Step 6: Taste and Adjust
Add more concentrate if you want it stronger, or more milk if you want it lighter. This recipe is really more of a formula than a fixed rule.
Substitutions and Variations
| Original | Swap | Notes |
|---|---|---|
| Cold brew concentrate | Strong hot-brewed coffee, chilled | Faster, but slightly more acidic taste |
| Simple syrup | Honey, maple syrup, or stevia | Warm honey slightly before adding so it blends |
| Whole milk | Oat milk, almond milk, coconut milk | Oat milk froths the best if you want it creamy |
| Plain iced coffee | Vanilla iced coffee | Add 1/2 tsp vanilla extract |
| Plain iced coffee | Iced mocha | Stir in 1 tbsp chocolate syrup |
| Plain iced coffee | Cinnamon iced coffee | Add a pinch of cinnamon to the grounds before steeping |
Make Ahead Tips
The concentrate is the whole point of making ahead. Brew a big batch once a week and you’re set for days.
Store it in a sealed jar in the fridge for up to two weeks. It actually gets slightly smoother after the first day or two.
Skip mixing in the milk and sweetener until you’re ready to drink it. Those don’t hold up nearly as well over time.
Estimated Nutrition
Per serving (1 glass with milk and 1 tbsp simple syrup), roughly:
- Calories: 60
- Sugar: 10g
- Carbs: 11g
- Fat: 2g
- Protein: 1g
Note: these are estimates. I’d recommend running your exact ingredients through Cronometer before you rely on these numbers for anything strict.
What to Pair It With
- A warm slice of banana bread
- Greek yogurt with granola and berries
- A buttery croissant
- Overnight oats
Storage and Leftovers
The concentrate keeps in the fridge for up to two weeks in a sealed container.
Once you’ve mixed a glass with milk, drink it within a day. Milk doesn’t hold up the same way the black concentrate does.
Freeze leftover concentrate into ice cube trays if you want coffee ice cubes on hand for later. This is honestly one of my favorite tricks on this whole list.
FAQ
Can I use a coffee maker instead of cold brewing?
You can, but it won’t taste the same. Cold brewing pulls out different compounds than hot brewing, and it’s naturally less acidic and less bitter. Hot-brewed coffee chilled over ice will work in a pinch, just expect a sharper flavor.
Why does my iced coffee taste watery?
You’re probably brewing it at normal strength and then pouring it over ice, which melts fast and dilutes everything. Brew it stronger than you think you need, or use coffee ice cubes instead of regular ones.
Do I have to steep it for 12 hours?
You’ll get better results with the full steep time, but even 8 hours will give you something drinkable if you’re in a hurry.
Can I make this without a strainer?
A clean kitchen towel works if you don’t have cheesecloth or a nut milk bag. It’ll take a bit longer, but it gets the job done.
Is cold brew stronger than regular coffee?
The concentrate itself is much stronger, but you’re diluting it with water, milk, and ice before drinking it. Once it’s mixed into a glass, the caffeine content ends up fairly similar to a regular cup, sometimes even a bit higher depending on your ratio.
Wrapping Up
Once you make your own batch of this, going back to paying $6 a cup starts to feel a little ridiculous.
Give it a try this week and let me know how it turns out in the comments below. I’d love to hear what add-ins or flavors you end up loving.
And if you run into any questions while you’re making it, drop them below too. I read every single comment.