You’ve made chocolate chip cookies before. You probably have a go-to recipe. And you probably think they’re pretty good.
They’re not as good as these. 😅
Brown butter is the secret that most home bakers skip — and it’s the reason these cookies taste like something from a bakery you’d wait in line for. Nutty, caramel-y, and deeply chocolatey. One batch and you’ll never go back.
Fair warning: people will ask you for this recipe. A lot.
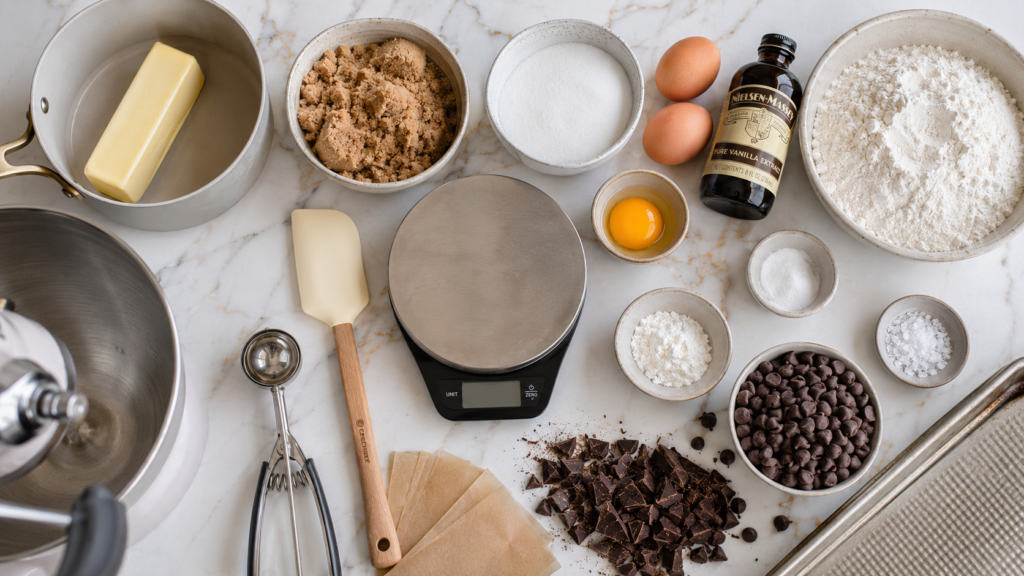
What You’ll Need
For the Brown Butter Base:
- 1 cup (226g) unsalted butter
- 1 cup (200g) light brown sugar, packed
- ½ cup (100g) granulated white sugar
- 2 large eggs + 1 egg yolk, room temperature
- 2 tsp pure vanilla extract
For the Dough:
- 2¼ cups (280g) all-purpose flour
- 1 tsp baking soda
- 1 tsp fine sea salt
- ½ tsp cornstarch (the texture secret)
The Chocolate:
- 1½ cups (255g) semi-sweet chocolate chips
- ½ cup (85g) chopped dark chocolate (60-70% cacao)
Finishing Touch:
- Flaky sea salt (Maldon works great) for topping
Tools You’ll Need
- Medium saucepan (light-colored if possible, so you can see the butter browning)
- Stand mixer or hand mixer with bowl
- Rubber spatula
- Baking sheets (2)
- Parchment paper or silicone baking mats
- Cookie scoop or large spoon
- Cooling rack
- Plastic wrap (for chilling the dough)
- Kitchen scale (highly recommended for accuracy)
Pro Tips
Here’s what makes the difference between good cookies and great cookies:
- Use a light-colored pan to brown your butter. Dark pans make it impossible to see when the butter turns golden. You want to catch it the moment it smells nutty and the milk solids go amber — not black.
- Chill your dough for at least 30 minutes. This is the step everyone skips and then wonders why their cookies spread into flat discs. The chill time lets the flour hydrate and keeps everything thick and chewy.
- Pull them out when they still look underdone. I know, it’s terrifying. But cookies continue cooking on the hot pan after you pull them from the oven. If they look perfect in the oven, they’ll be overdone by the time they cool.
- Add chopped chocolate alongside your chips. The chips hold their shape; the chopped chocolate melts into puddles. You get two totally different chocolate experiences in one cookie. 🍫
- Don’t skip the egg yolk. That extra yolk adds richness and chew that you simply can’t get from two whole eggs alone.
Substitutions and Variations
Flour: Swap up to half the all-purpose flour with bread flour for an even chewier cookie.
Chocolate: Use milk chocolate chips if you prefer sweeter, or go all dark chocolate for something more intense.
Eggs: For an egg-free version, use 1 flax egg per whole egg (1 tbsp ground flax + 3 tbsp water, rest 5 minutes).
Butter: Vegan butter (like Miyoko’s) works for browning and gives a similar result. Just watch it carefully — it can burn faster.
Add-ins: Toasted walnuts, pecans, or even a sprinkle of espresso powder in the dough takes things up a notch.
Gluten-free: A 1:1 GF flour blend (Bob’s Red Mill or King Arthur) works well here.
Make Ahead Tips
These cookies are genuinely better when the dough rests overnight.
- Refrigerate the dough: Up to 72 hours. The longer it rests, the more complex the flavor gets.
- Freeze the dough balls: Scoop the dough, freeze on a baking sheet until solid, then transfer to a zip-lock bag. Bake from frozen — just add 2-3 minutes to the bake time.
- Freeze baked cookies: Cool completely, store in an airtight container with parchment between layers. They’ll keep for up to 3 months.
Nutritional Info (Per Cookie, Approx.)
Makes about 24 cookies
| Nutrient | Amount |
|---|---|
| Calories | ~210 kcal |
| Total Fat | 11g |
| Saturated Fat | 6.5g |
| Carbohydrates | 28g |
| Sugar | 18g |
| Protein | 2.5g |
| Sodium | 115mg |
Dietary notes: Contains gluten, dairy, eggs, and soy (from chocolate). See substitutions above for alternatives.
Meal pairing: Serve warm with a scoop of vanilla bean ice cream, a cold glass of whole milk, or a strong cup of coffee. These cookies also make an incredible ice cream sandwich base.
Time efficiency tip: Brown the butter the night before and refrigerate it. It solidifies back into a spreadable consistency and you can cream it straight from the fridge the next day without waiting for it to cool.
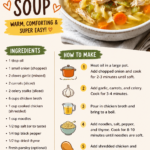
How to Make Brown Butter Chocolate Chip Cookies
Step 1: Brown the Butter
Add the butter to your saucepan over medium heat. Stir constantly.
It’ll melt, then foam, then foam again — that second foam is when you’re close. Keep stirring until you see golden-brown bits at the bottom and it smells like toasted hazelnuts. Pull it off the heat immediately and pour into your mixing bowl.
Let it cool for 15-20 minutes until it’s warm but not hot.
Step 2: Make the Dough
Add both sugars to the cooled brown butter and beat on medium for 2 minutes until combined.
Add the 2 eggs, egg yolk, and vanilla. Beat for another 2 minutes — the mixture should look pale and slightly thick.
In a separate bowl, whisk together the flour, baking soda, salt, and cornstarch. Add to the butter mixture and mix on low until just combined. Don’t overdo it.
Fold in the chocolate chips and chopped chocolate with a spatula.
Step 3: Chill
Cover the bowl with plastic wrap and refrigerate for a minimum of 30 minutes. (Overnight is ideal. Truly.)
Step 4: Scoop and Bake
Preheat your oven to 375°F (190°C). Line your baking sheets with parchment paper.
Scoop the dough into balls about 2 tablespoons each. Place them 2 inches apart on the baking sheet.
Bake for 10-12 minutes until the edges are set but the centers still look slightly underdone and glossy. Sprinkle flaky sea salt on top immediately when they come out.
Step 5: Cool (If You Can Wait)
Let them sit on the pan for 5 minutes — they’ll continue to firm up.
Then transfer to a cooling rack. Or eat one immediately. I won’t judge. 🤫
Leftovers and Storage
| Storage Method | How Long |
|---|---|
| Room temperature (airtight container) | Up to 5 days |
| Refrigerator | Up to 10 days |
| Freezer (baked) | Up to 3 months |
| Freezer (unbaked dough balls) | Up to 3 months |
Pro tip for keeping them soft: Store with a slice of bread in the container. The cookies absorb moisture from the bread and stay chewy for days.
To reheat, microwave for 10-15 seconds. They come back to life.
FAQ
Why do I need to brown the butter? Browning the butter removes the water content and toasts the milk solids. This creates a nutty, almost caramel-like flavor that plain melted butter just can’t replicate. It takes about 5 extra minutes and it is absolutely worth it.
My cookies keep spreading flat. What’s going wrong? Almost always one of three things: the dough wasn’t chilled long enough, the butter was too warm when you mixed it, or you’re using too much flour (pack it in and weigh it). A kitchen scale eliminates that last problem entirely.
Can I use salted butter? You can, but reduce the added salt to ½ teaspoon so they don’t come out too salty.
Do I have to use the cornstarch? You don’t have to, but it does give the cookies that soft, almost bakery-style texture. It’s a small addition with a noticeable difference.
My brown butter went too dark/burnt. What now? Start over. Burnt butter has a bitter flavor that will come through in the cookies. It happens fast the first time — just stay close to the pan and keep stirring.
Can I make these without a mixer? Yes. A bowl and a whisk work perfectly here. You just need a little more elbow grease when beating the eggs and sugar together.
How do I know they’re done? The edges will look set and lightly golden. The centers will look slightly underdone and almost shiny. That’s exactly what you want.
Wrapping Up
If you’ve been making the same chocolate chip cookie recipe for years, this is your sign to try something new.
Brown butter sounds fancy. It’s not. It’s five minutes at the stove and it completely changes what a cookie can taste like.
Make these for a Friday night in, for someone’s birthday, or honestly just because you want something really good.
And when you do — drop a comment below and tell me how it went. Did you chill the dough? Did you sneak one straight from the oven? Any questions, leave them there too.