I used to think rotisserie chicken from the grocery store was basically a kitchen win.
Then I made this lemon chicken on a random Tuesday and ruined that for myself forever.
My husband Silas literally stopped chewing and asked what I did differently. I hadn’t done anything complicated. Just butter, garlic, lemon 🍋, and a cast iron skillet that’s older than our marriage.
This is the kind of dinner that looks like it took hours. It didn’t. It took about 35 minutes, and most of that was just waiting around while it cooked.
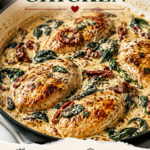
Crispy golden skin. Juicy chicken underneath. And a lemon garlic butter sauce so good you’ll want to pour it over literally everything on your plate.
Here’s exactly how to make it, plus the small details that take it from “good” to “wait, you made this?”
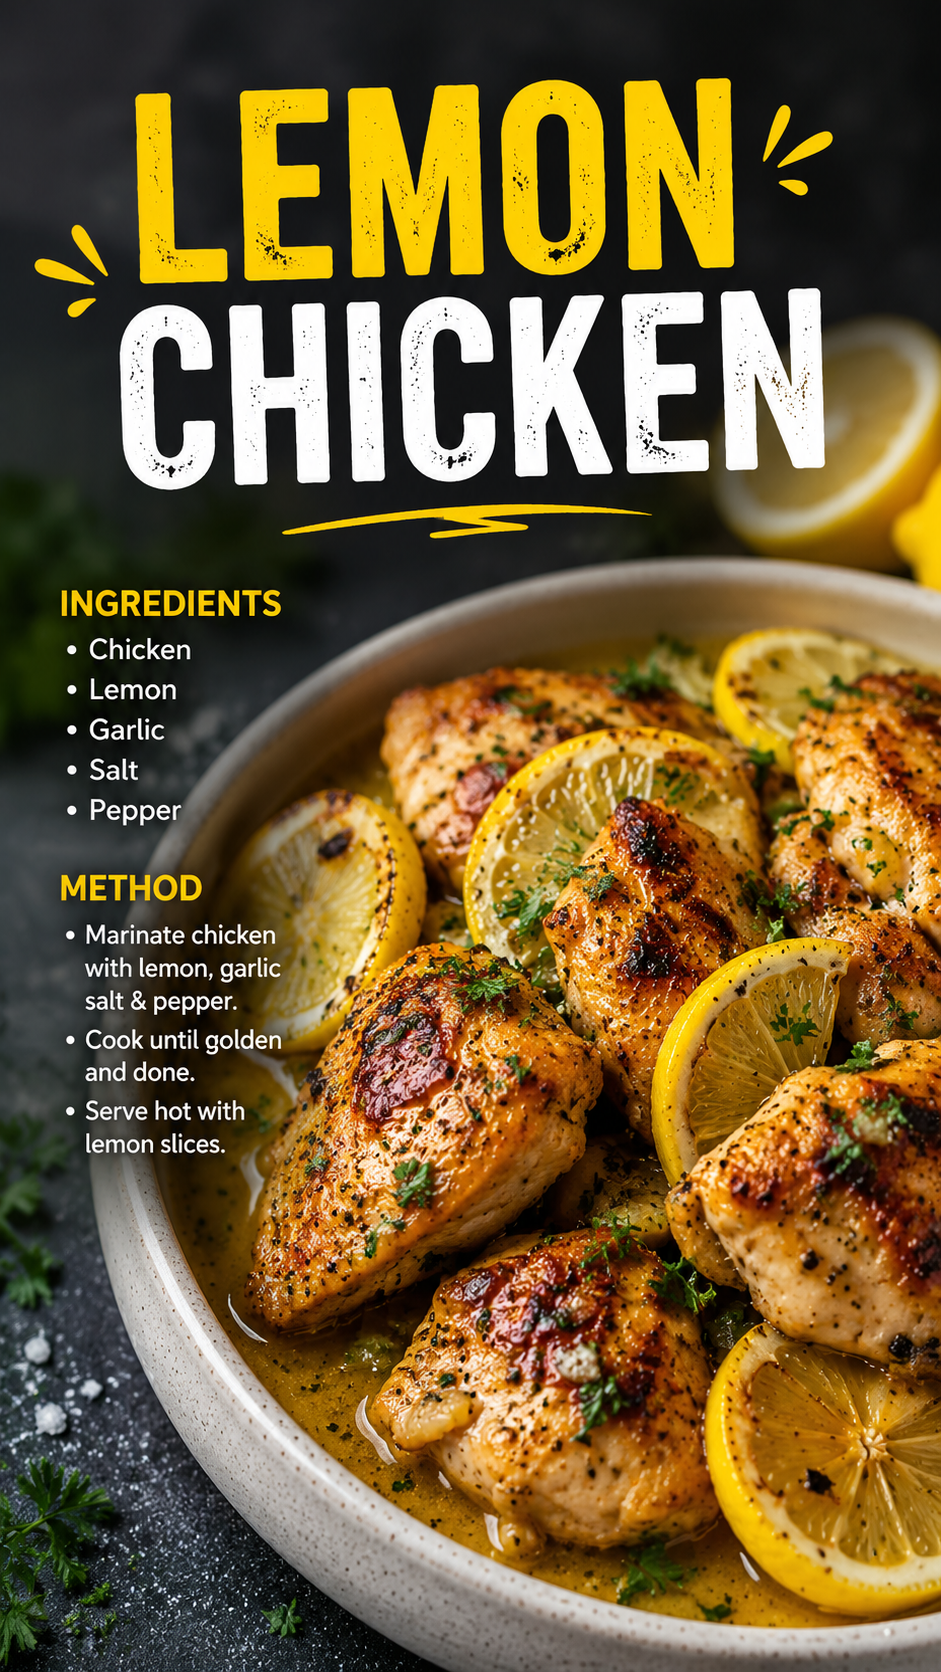
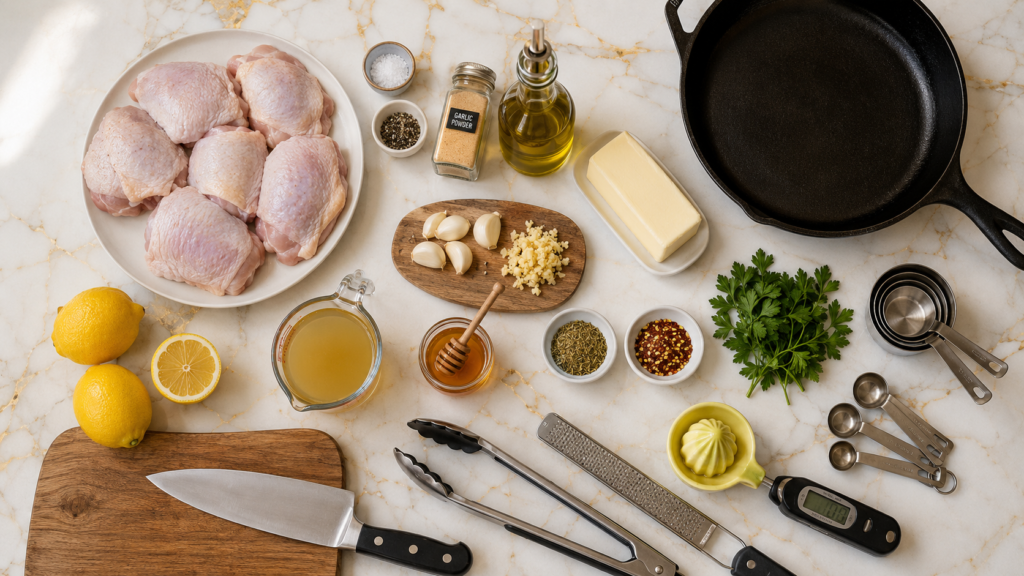
What You’ll Need
This recipe comes together with ingredients you probably already have, minus the lemons.
For the Chicken
- 6 bone-in, skin-on chicken thighs (about 2.5 lbs)
- 1 teaspoon salt
- 1/2 teaspoon black pepper
- 1 teaspoon garlic powder
- 2 tablespoons olive oil
For the Lemon Garlic Butter Sauce
- 4 tablespoons butter
- 5 garlic cloves, minced
- 2 lemons (zested and juiced)
- 3/4 cup chicken broth
- 1 tablespoon honey
- 1 teaspoon dried oregano
- 1/4 teaspoon red pepper flakes (optional)
- 2 tablespoons fresh parsley, chopped
That’s it. No weird specialty ingredients, no trip to three different grocery stores.
Tools You’ll Need
- Large oven-safe skillet (cast iron is ideal)
- Tongs
- Microplane or zester
- Citrus juicer
- Meat thermometer
- Cutting board and knife
- Measuring cups and spoons
You really only need one pan for this whole recipe. Less dishes, more time to actually enjoy dinner.
How to Make Lemon Garlic Butter Chicken
Step 1: Dry and season the chicken.
Pat the chicken thighs completely dry with paper towels. This step matters more than it sounds, since wet chicken skin will never get crispy no matter what you do after this.
Season both sides with salt, pepper, and garlic powder.
Step 2: Sear it.
Heat the olive oil in your skillet over medium-high heat. Place the chicken skin-side down and let it sit undisturbed for 6 to 7 minutes.
Don’t move it around. Don’t peek every 30 seconds. Just let it do its thing until the skin turns deep golden and crispy.
Step 3: Flip and finish the sear.
Flip the chicken and cook the other side for about 5 minutes. Remove it from the skillet and set it aside on a plate.
Step 4: Build the sauce.
Lower the heat to medium. Add the butter to the same skillet and let it melt into all those browned bits left behind. That’s free flavor, don’t waste it.
Add the garlic and cook for about 30 seconds, just until fragrant. Garlic burns fast, so keep an eye on it here.
Step 5: Add the lemon and broth.
Stir in the lemon zest, lemon juice, chicken broth, honey, oregano, and red pepper flakes if you’re using them. Scrape the bottom of the pan as you stir.
Step 6: Return the chicken.
Place the chicken back in the skillet, skin-side up, nestled right into the sauce.
Step 7: Cook it through.
You’ve got two options here:
- Stovetop: Cover and simmer on medium-low for 12 to 15 minutes.
- Oven: Transfer the whole skillet to a 400°F oven for 18 to 20 minutes.
Either way, the chicken is done once it hits 165°F internally. This is where the meat thermometer earns its spot in your kitchen drawer.
Step 8: Rest, garnish, and serve.
Let the chicken rest for 5 minutes before serving. Sprinkle with fresh parsley and spoon that sauce over everything. I mean it, everything.
Pro Tips
- Dry chicken equals crispy chicken. I mentioned this already, but it’s worth repeating since skipping it is the number one reason people end up with rubbery skin instead of crispy skin.
- Don’t rush the sear. Six minutes feels long when you’re hungry, but moving the chicken too early is how you lose that golden crust.
- Save your lemon zest before juicing. It’s easy to forget once you’ve already cut into the lemon, and the zest adds a brightness the juice alone can’t give you.
- Use a splatter screen if you have one. Searing chicken skin-side down gets messy fast, and your stovetop will thank you.
- Taste the sauce before adding the chicken back in. If it’s too tart, a touch more honey balances it out instantly.
Substitutions and Variations
This recipe is pretty flexible, which makes it perfect for whatever’s already sitting in your fridge.
| Original | Swap | Why It Works |
|---|---|---|
| Bone-in chicken thighs | Boneless thighs | Cooks faster, just cut the time by 5-7 minutes |
| Chicken thighs | Chicken breasts | Leaner option, watch closely so it doesn’t dry out |
| Butter | Ghee or olive oil | Dairy-free version, still rich |
| Honey | Maple syrup | Same sweetness, slightly different flavor note |
| Oregano | Thyme or rosemary | More earthy, pairs really well with lemon |
Want to switch things up even more? Add a tablespoon of capers with the sauce for a lemon caper version that tastes like something off a restaurant menu.
Make Ahead Tips
You can season the chicken up to 24 hours in advance and keep it covered in the fridge. This actually deepens the flavor.
The sauce ingredients can also be measured and combined ahead of time, minus the broth, so all you have to do is pour and cook when you’re ready.
If you want serious flavor, marinate the chicken thighs in lemon juice, garlic, and oregano overnight. Just pat them dry again before searing.
Nutritional Breakdown (Per Serving)
| Nutrient | Amount |
|---|---|
| Calories | 410 |
| Protein | 32g |
| Fat | 28g |
| Carbohydrates | 6g |
| Sodium | 540mg |
These numbers are estimates based on standard ingredient measurements, and they’ll shift a bit depending on your exact cuts of chicken and portion sizes.
Meal Pairing Suggestions
This chicken pairs well with something that can soak up the sauce.
- Garlic mashed potatoes
- Steamed rice
- Roasted asparagus or green beans
- Crusty bread for sauce dipping
- A simple arugula salad with lemon vinaigrette
Storing and Reheating Leftovers
Leftovers keep in an airtight container in the fridge for 3 to 4 days.
To freeze, store the chicken and sauce together in a freezer-safe container for up to 3 months. Thaw overnight in the fridge before reheating.
For reheating, a skillet over medium-low heat works best for keeping the skin somewhat crispy. Microwaving works too, just cover the dish so the chicken doesn’t dry out.
Frequently Asked Questions
Can I use chicken breasts instead of thighs?
Yes, though thighs stay juicier and are more forgiving if slightly overcooked. If using breasts, watch your internal temperature closely.
Can I use bottled lemon juice?
Fresh lemons make a noticeable difference here, in both the zest and the brightness of the juice. Bottled juice will work in a pinch, but it won’t taste quite the same.
Is this recipe gluten free?
Yes, as written. Just double check your chicken broth brand to be safe, since some add fillers.
Can I make this in an air fryer?
You can sear the chicken in an air fryer at 400°F for about 10 minutes per side, then transfer it to a skillet to finish the sauce on the stovetop.
Why is my sauce too thin?
Let it simmer uncovered for a few extra minutes before adding the chicken back in. It’ll reduce and thicken on its own.
Wrapping Up
This lemon chicken recipe earned a permanent spot in our weekly dinner rotation, and I have a feeling it’s about to do the same for yours.
It’s simple enough for a random Tuesday and good enough that nobody will believe it only took one pan. 😅
Make it this week and let me know how it turns out in the comments below. And if you run into any questions along the way, drop them there too. I read every single one.