
You know that dish that makes you close your eyes after the first bite? 🍚
This is that dish.
Chicken biryani is one of those recipes that looks like it belongs in a restaurant — golden, fragrant, layered rice with perfectly spiced chicken underneath. And yet, once you know the steps, it’s shockingly doable at home.
Fair warning though: after you make this once, plain rice is going to feel like a punishment.
What Makes Biryani Actually Different From Regular Rice
Here’s something most people don’t realize.
Biryani isn’t just spiced rice with chicken thrown in. It’s a layered dish — the rice and chicken are cooked separately, then stacked and finished together with steam (a technique called dum). That process is what creates those deeply aromatic layers and that signature fluffy-yet-rich texture.
A pot of biryani also uses whole spices like cardamom, cloves, bay leaves, and cinnamon. Not for eating — they’re there purely for fragrance. And that fragrance is everything.
One more thing: the chicken is marinated, not just seasoned. That marinade is doing a lot of the heavy lifting here, so don’t skip it.
What You’ll Need
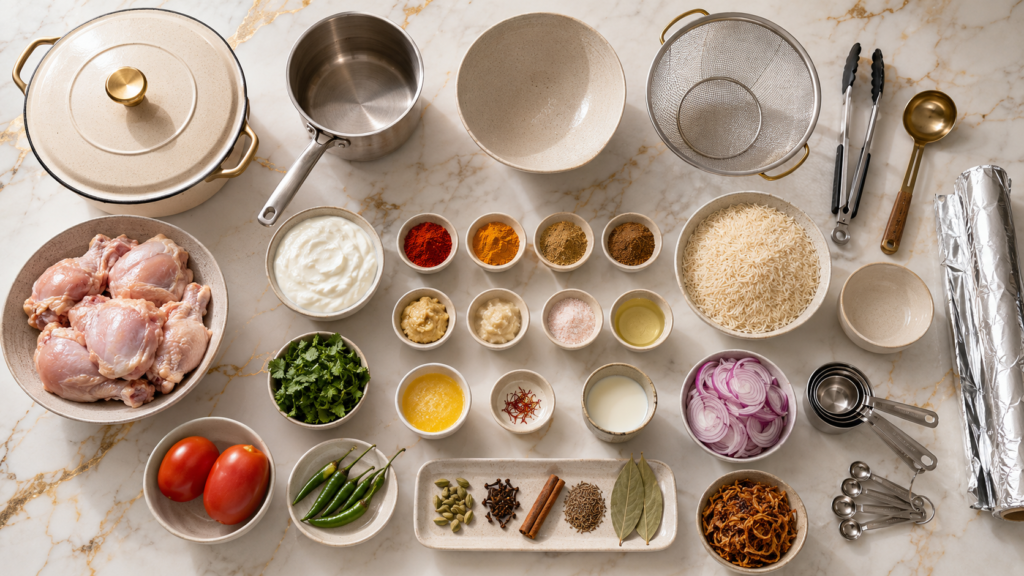
For the Chicken Marinade
- 1.5 lbs (700g) bone-in chicken pieces (thighs and drumsticks work best)
- 1 cup plain whole-milk yogurt
- 1.5 tsp red chili powder (adjust to taste)
- 1 tsp turmeric powder
- 1.5 tsp cumin powder
- 1.5 tsp coriander powder
- 1 tsp garam masala
- 1 tbsp ginger paste
- 1 tbsp garlic paste
- 1.5 tsp salt
- 2 tbsp neutral oil (vegetable or canola)
For the Rice
- 2 cups basmati rice (long-grain is essential here)
- 4 cups water
- 1 bay leaf
- 4 green cardamom pods
- 4 cloves
- 1 cinnamon stick (2 inches)
- 1 tsp salt
- 1 tsp oil
For the Biryani Base (Masala)
- 3 tbsp ghee (or butter if needed)
- 2 large onions, thinly sliced
- 2 medium tomatoes, chopped
- 1 tsp cumin seeds
- 2 green chilies, slit lengthwise
- 1 tsp garam masala
- Salt to taste
- 1/4 cup fresh cilantro (coriander), chopped
- 1/4 cup fresh mint leaves, chopped
For the Layering
- 2 tbsp warm milk
- A pinch of saffron (about 10-12 strands)
- 2 tbsp ghee
- Fried onions (store-bought crispy onions work great here)
- Extra fresh mint and cilantro
Tools You’ll Need
- Large heavy-bottomed pot with a tight-fitting lid (a Dutch oven is ideal)
- Medium saucepan (for parboiling the rice)
- Large mixing bowl (for the marinade)
- Fine mesh strainer or colander
- Tongs
- Ladle
- Measuring cups and spoons
- A small bowl (for the saffron milk)
- Aluminum foil (to seal the pot during dum)
Pro Tips
These are the things that make the difference between “pretty good” and “I need to make this every week.”
1. Marinate the chicken overnight if you can. Even 2 hours works, but overnight takes the flavor from good to really good. The yogurt tenderizes the meat and the spices go deeper.
2. Don’t fully cook the rice before layering. Parboil it to about 70% done — it should still have a slight bite. It finishes cooking during the dum steam, and if it’s already fully cooked before layering, it’ll turn mushy.
3. Fry those onions low and slow. Golden brown, crispy, caramelized onions are one of the flavor backbones of this dish. Rushing them on high heat gives you pale, bitter onions. Medium-low heat, patience, incredible results.
4. The saffron milk is not optional. That tiny pinch of saffron bloomed in warm milk is what gives biryani its iconic golden streaks and that subtle floral note. It’s a small step with a big payoff.
5. Seal the pot properly during dum. Cover the pot tightly with foil first, then put the lid on top. This traps the steam and cooks everything together without losing flavor to evaporation.
How to Make Chicken Biryani
Step 1: Marinate the Chicken
In a large bowl, combine the yogurt, red chili powder, turmeric, cumin, coriander, garam masala, ginger paste, garlic paste, salt, and oil.
Add the chicken pieces and coat them thoroughly.
Cover and refrigerate for at least 2 hours. Overnight is better if you have the time.
Step 2: Bloom the Saffron
Add 10-12 saffron strands to 2 tablespoons of warm milk.
Let it sit for at least 15 minutes. It’ll turn a gorgeous deep orange-yellow. Set aside.
Step 3: Fry the Onions
Heat 3 tablespoons of ghee in your heavy-bottomed pot over medium-low heat.
Add the sliced onions and cook, stirring occasionally, for 20-25 minutes until they’re deep golden brown and caramelized.
Remove half of the fried onions and set aside for layering. Leave the other half in the pot.
Step 4: Cook the Chicken Masala
In the same pot with the remaining onions, add cumin seeds and green chilies. Let them sizzle for 30 seconds.
Add the marinated chicken pieces and cook on medium-high heat for 5-7 minutes, turning occasionally, until the chicken gets some color.
Add chopped tomatoes, stir well, and cook for another 8-10 minutes until the tomatoes break down and the oil starts to separate from the masala.
Stir in garam masala, then turn the heat to low. Add half the fresh cilantro and mint. Cover and cook for 15 minutes until the chicken is about 80% cooked through. Set aside.
Step 5: Parboil the Rice
Rinse the basmati rice in cold water 3-4 times until the water runs clear. Soak for 20 minutes, then drain.
In a large saucepan, bring 4 cups of water to a rolling boil.
Add salt, oil, bay leaf, cardamom pods, cloves, and the cinnamon stick.
Add the drained rice and cook for exactly 5-6 minutes — until it’s about 70% cooked (still has a slight bite in the center). Drain immediately.
Step 6: Layer the Biryani
In the same heavy pot with the chicken, spread the parboiled rice evenly on top of the chicken in one layer.
Drizzle the saffron milk over the rice in a zigzag pattern.
Add the reserved fried onions, the remaining fresh mint and cilantro, and 2 tablespoons of ghee.
Step 7: Dum (Steam Cooking)
Cover the pot tightly with aluminum foil, then place the lid firmly on top.
Cook on high heat for 3 minutes, then reduce to the lowest possible heat and cook for 20-25 minutes.
Turn off the heat and let it rest, undisturbed, for 10 minutes. Do not lift the lid during cooking or the steam escapes.
Step 8: Serve
Gently fluff and mix the layers from the bottom up with a large spoon or spatula, making sure to get all those gorgeous layers together.
Serve hot with raita, a fresh salad, or just straight from the pot. 😌
Substitutions and Variations
Chicken: Boneless thighs work well if you prefer easier eating. Bone-in adds more flavor, though.
Ghee: Butter is a fine swap if you don’t have ghee on hand. The flavor is slightly different but still great.
Yogurt: Full-fat coconut yogurt works for a dairy-free version.
Saffron: If saffron isn’t in your budget, a tiny pinch of turmeric in warm milk mimics the color (though not the flavor).
Spice level: Cut the red chili powder in half for a milder version. Add more green chilies if you want more heat.
Vegetarian: Swap chicken for cauliflower and potatoes (aloo gobi biryani). Same method, same spices, equally good.
Make-Ahead Tips
- Marinate the chicken up to 24 hours in advance and store in the fridge.
- Fry the onions the day before and store them in an airtight container at room temperature.
- Cook the chicken masala a day ahead. Reheat before layering.
The only thing you need to do fresh is parboil the rice and do the final dum. Which honestly only takes about 40 minutes.
Nutritional Breakdown (Per Serving, Approx.)
| Nutrient | Amount |
|---|---|
| Calories | ~520 kcal |
| Protein | 32g |
| Carbohydrates | 55g |
| Fat | 16g |
| Fiber | 3g |
| Sodium | ~680mg |
Based on a serving of approximately 1.5 cups rice + 1-2 chicken pieces. Values are estimates.
Meal Pairing Suggestions
Biryani is a meal on its own, but these sides take it to another level:
- Raita (yogurt with cucumber and cumin) — cools down the heat beautifully
- Mirchi ka salan — a spicy green chili gravy that’s traditional with biryani
- Kachumber salad (diced cucumbers, tomatoes, onions, and lemon juice) — adds freshness
- Mango pickle — a little jar goes a long way
Leftovers and Storage
Biryani is honestly even better the next day. The flavors deepen overnight in a way that’s genuinely surprising.
- Fridge: Store in an airtight container for up to 3 days.
- Reheating: Add a splash of water before reheating on the stovetop or microwave to keep the rice from drying out. Cover while reheating.
- Freezer: Freeze the cooked chicken masala and rice separately for up to 1 month. Defrost overnight in the fridge before reheating.
FAQ
Can I use boneless chicken? Absolutely. Boneless thighs are the easiest to work with. Just reduce the masala cooking time slightly since boneless cooks faster than bone-in.
My rice turned out mushy. What happened? The most common culprit is over-cooking the rice during the parboiling step. Keep it at 70% done — it should still have some resistance in the center.
I don’t have a Dutch oven. Can I still make this? Yes. Any heavy-bottomed pot with a tight lid works. Just make sure the base doesn’t have hot spots that could burn the bottom layer. A cast iron pot is a great alternative.
Can I make biryani without saffron? You can, and it’ll still taste great. The saffron adds a subtle floral note and that signature yellow streaking across the rice. Without it, the flavor is still excellent — just a little different visually.
How do I know the chicken is fully cooked during dum? If the chicken was about 80% cooked during the masala phase and you do the full 20-25 minute dum on low heat, it’ll be fully cooked. If you’re unsure, use a meat thermometer — internal temp should reach 165°F (74°C).
Is biryani spicy? It’s warmly spiced, not fiery hot by default. The spices are aromatic rather than aggressive. You can dial the chili powder up or down to hit your preferred heat level.
Wrapping Up
If you’ve been putting off making biryani because it looked too complicated, I get it. It does have steps. But once you work through it the first time, you’ll realize none of those steps are actually difficult.
And when you lift that lid and see those golden saffron streaks across fluffy, fragrant rice — you’ll know it was worth every single minute. 🙌
Give it a try this weekend and come back and let me know how it went. Drop your questions, your wins, and even your “okay I burned the onions” moments in the comments below. All of it is welcome.