Have you ever watched a kid eat an entire chocolate cake on screen and thought “I need that in my life right now”?
Same.
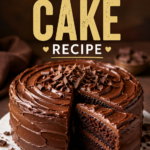
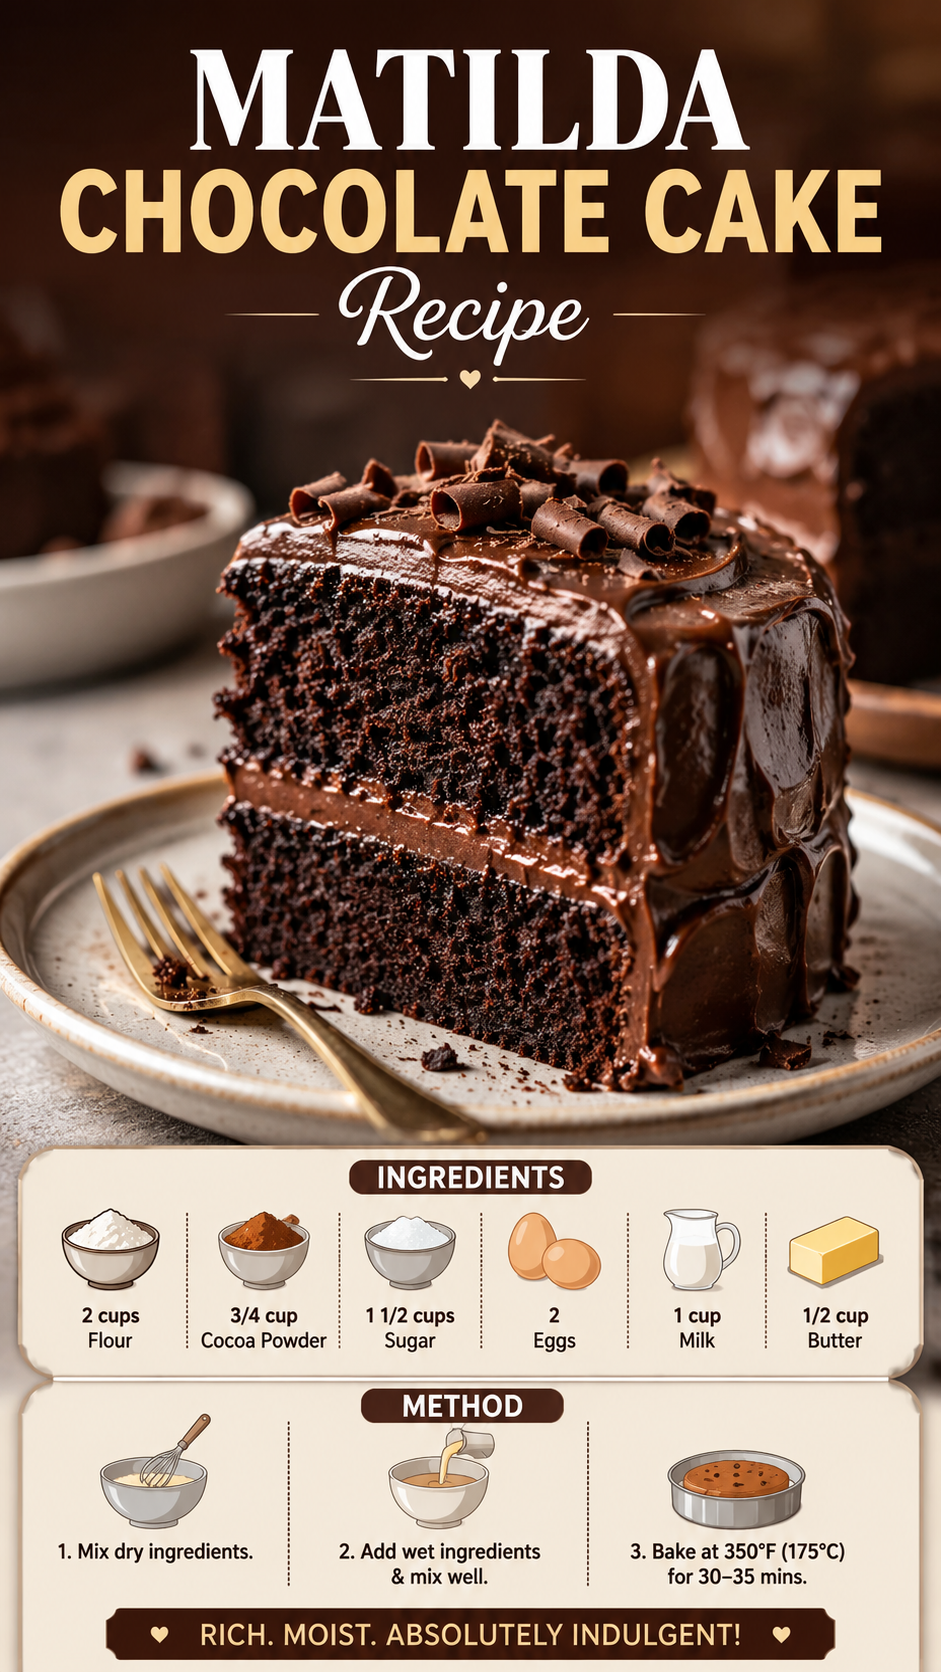
That scene from Matilda has lived rent-free in my head since I was a kid, and honestly, the cake deserves its own fan club. 🍫
So I finally made it. Multiple times, actually, because the first attempt was good but not “Bruce Bogtrotter good.”
This version is dense, fudgy, and almost too rich. It’s the kind of cake where one slice feels like a personality test (do you finish it, or do you tap out halfway?).
I’m sharing exactly how I made it, plus everything I’d want to know before starting if this was my first time baking it.
What You’ll Need
Here’s everything to grab before you start. Nothing fancy, just real ingredients that actually matter.
For the cake:
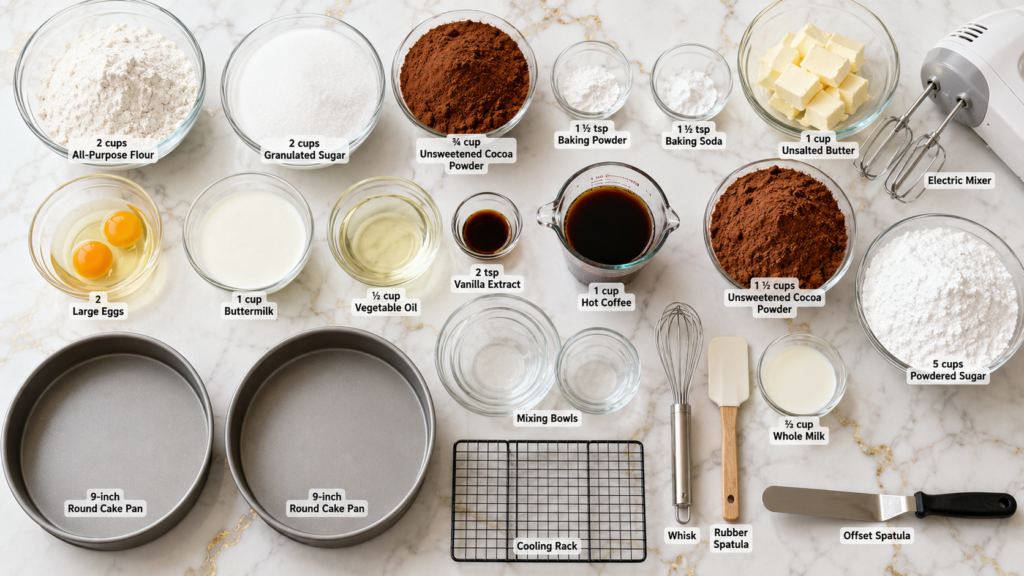
- 2 cups all-purpose flour
- 2 cups granulated sugar
- ¾ cup unsweetened cocoa powder
- 1 ½ tsp baking powder
- 1 ½ tsp baking soda
- 1 tsp salt
- 2 large eggs
- 1 cup buttermilk
- ½ cup vegetable oil
- 2 tsp vanilla extract
- 1 cup hot coffee (or hot water if you’re avoiding caffeine)
For the frosting:
- 1 cup unsalted butter, softened
- 1 ½ cups unsweetened cocoa powder
- 5 cups powdered sugar
- ⅔ cup whole milk
- 2 tsp vanilla extract
- Pinch of salt
That’s it. No weird ingredients, no trip to a specialty store required.
Tools You’ll Need
- Two 9-inch round cake pans
- Mixing bowls (one big, one medium)
- Electric mixer or stand mixer
- Whisk
- Rubber spatula
- Cooling rack
- Offset spatula (for frosting, though a butter knife works too)
How to Make It
Step 1: Prep your pans and oven.
Preheat your oven to 350°F. Grease your cake pans and line the bottoms with parchment paper. This cake is moist enough that skipping this step usually ends in tears.
Step 2: Mix the dry ingredients.
In your big bowl, whisk together the flour, sugar, cocoa powder, baking powder, baking soda, and salt. Just get it evenly combined, nothing complicated here.
Step 3: Add the wet ingredients.
Add the eggs, buttermilk, oil, and vanilla. Mix on medium speed for about 2 minutes.
Step 4: Pour in the hot coffee.
This is where the batter goes from “thick brownie mix” to “thin chocolate soup,” and that’s exactly what you want. The coffee deepens the chocolate flavor without making the cake taste like coffee at all.
Step 5: Bake.
Divide the batter evenly between your two pans and bake for 30 to 35 minutes. You’ll know it’s ready when a toothpick comes out with just a few moist crumbs.
Step 6: Cool completely.
Let the cakes sit in the pans for about 10 minutes, then transfer to a cooling rack. This part takes patience, but frosting a warm cake is a mess waiting to happen.
Step 7: Make the frosting.
Beat the softened butter until it’s light and fluffy. Add the cocoa powder and mix until combined. Slowly add the powdered sugar, alternating with the milk, until it’s smooth and spreadable. Stir in vanilla and salt last.
Step 8: Assemble.
Place one cake layer on your serving plate, spread a generous layer of frosting, then top with the second layer. Frost the entire cake, and don’t worry about making it perfect.
Pro Tips
- Use room temperature ingredients. Cold eggs or buttermilk can make the batter separate slightly, and that affects the texture once baked.
- Don’t skip the coffee. I know it sounds strange in a chocolate cake, but it’s the secret to that deep, almost bakery-style chocolate flavor.
- Weigh your flour if you can. Too much flour packed into a measuring cup is the number one reason chocolate cakes turn out dry.
- Let the frosting rest for a few minutes before spreading if it feels too soft. It firms up just enough to hold its shape.
- Crumb coat first if you want a cleaner look. A thin layer of frosting, a quick chill, then the final coat makes a huge difference.
Substitutions and Variations
- Gluten-free: Swap the all-purpose flour for a 1:1 gluten-free baking blend. The texture stays surprisingly close to the original.
- Dairy-free: Use a plant-based buttermilk (milk + vinegar works) and dairy-free butter for the frosting.
- No buttermilk on hand? Mix 1 cup milk with 1 tablespoon white vinegar or lemon juice and let it sit for 5 minutes.
- Want it extra fudgy? Add ½ cup of melted dark chocolate to the batter.
- Single layer version: Use one 9×13 pan instead of two round pans, and reduce bake time slightly.
Make Ahead Tips
You can bake the cake layers up to 2 days ahead. Wrap them tightly in plastic wrap and keep them at room temperature, or freeze them for up to a month.
The frosting can also be made a day in advance. Just bring it back to room temperature and give it a quick re-whip before using.
Leftovers and Storage
This cake keeps beautifully for up to 4 days at room temperature, covered tightly, or in the fridge for up to a week.
If you’re storing it in the fridge, let slices sit out for 15 to 20 minutes before eating. Cold chocolate cake just isn’t the same experience.
It also freezes well. Wrap individual slices in plastic wrap, then foil, and they’ll keep for about 2 months.
FAQ
Why is the batter so thin? That’s normal! The hot coffee thins it out significantly, which is part of what keeps this cake so moist.
Can I use a different size pan? Yes, just adjust your bake time. A 9×13 pan will need about 35 to 40 minutes.
Can I make cupcakes with this recipe? You can. This batter makes about 24 cupcakes, and they’ll bake for around 18 to 20 minutes.
Is this cake very sweet? It’s rich, but not overly sweet. The bittersweet cocoa balances out the sugar nicely.
Can kids handle this recipe with help? Definitely. It’s a great one to bake together since the steps are simple and forgiving.
Wrapping Up
If you’ve ever wanted to recreate that unforgettable Matilda moment, this is your sign to finally do it.
Bake it for a birthday, a random Tuesday, or just because you deserve cake. No real reason needed.
Once you’ve made it, come back and tell me how it turned out. I’d love to hear if you tried any of the substitutions or if your kitchen survived the chocolate frosting stage in one piece. 🎂
And if you have any questions before you start baking, drop them in the comments. I read every single one.